
I. IN BRIEF
For informational purposes only. Always comply with applicable regulations and, in case of doubt, consult a qualified instructor. This document is provided solely for informational and educational use. It is not intended to replace the official procedures, training syllabi, checklists, or safety guidance issued by your airline, aeroclub, flight school, or civil aviation authority. This document is a synthesis of your own pre-flight research. It is designed as a memory aid, helping you remember essential items during flight preparation. Never underestimate the risks of routine, conditions change, and memory can fail. That is precisely why this tool exists: to help you stay safe. To use this guide, refer to the User Guide for the VFR Flight Preparation Worksheet provided by Icarus Toolbox.
II. Download the Printable Blank Form (NCO)
VFR Flight Preparation Worksheet (NCO)
III. User Guide – VFR Flight Dossier
III.1 How to complete your VFR flight dossier
We recommend completing the preparation steps in the suggested order. Some steps must be done before others to ensure realistic planning.
For example, start by checking the VAC charts to confirm that the aerodrome is accessible. Some aerodromes may be restricted, military, or located in mountainous areas with specific limitations. If the aerodrome is not accessible, the flight simply cannot be performed.
Next, review the weather before preparing the navigation log. Adverse weather conditions may require you to delay the flight, select another route, or change the destination. These decisions directly affect fuel planning, mass and balance, and aircraft performance calculations, which must always be based on the final and feasible flight plan.
However, flight preparation is often an iterative process. You may need to return to earlier steps. For instance, if the mass and balance check shows that the aircraft is too heavy, you may decide to shorten the route to reduce fuel requirements, which means reviewing the weather and NOTAMs again. Likewise, if a NOTAM affects your planned route, you may need to define a new route and perform a new weather analysis.
III.2 Suggested Preparation Steps
On the website, go to the Flight Preparation section to find guidance for each of the following steps:
-
- Review VAC charts
- Plot the route on the map and identify airspaces and areas
- Select alternate aerodromes if needed
- Gather weather information
- Check aeronautical information (NOTAM, SUP AIP)
- Complete the navigation log (you can use our free VFR Nav Logs by clicking here)
- Fuel planning
- Weight and balance
- Performance calculations
- Aircraft technical status (Tech Log / MEL / etc.)
- Safety review (briefings, risk factors)
- File the flight plan and prepare the OFP
- Pilot and aircraft documentation
- Pilot fitness to fly
- Final go / no-go decision
The key is to cover every topic, stay structured, and build strong situational awareness to avoid unpleasant surprises during the flight, such as fog at destination or restricted airspace.
A well-prepared flight reduces mental workload in the air, giving you more capacity to fly safely and react effectively to unexpected events or failures.
We will now go through the process step by step.
III.3 Review VAC Charts
III.3.1 Airfield Access & Requirements
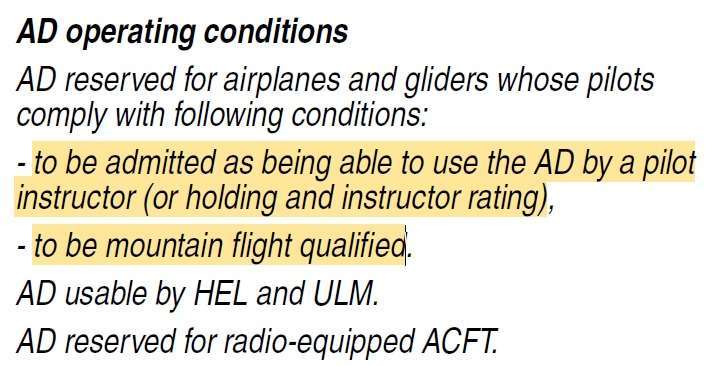
Check whether the aerodrome is open to visitors, if Prior Permission Required (PPR) applies, or if a special qualification is needed (e.g. mountain rating).
III.3.2 Runway data (for Performance Calculation)

Review declared distances (TODA, ASDA, LDA), slope, and surface type, as these are essential for performance calculations.
III.3.3 Preferred QFU
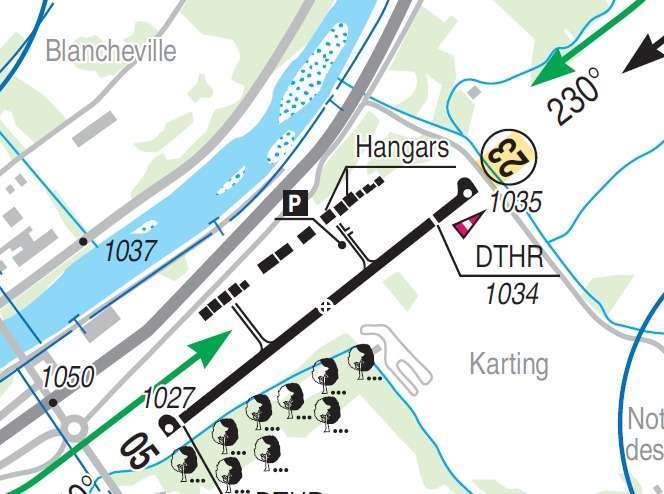
Identify the most suitable runway direction expected for departure or landing, considering prevailing winds and procedures.
III.3.4 Taxiway(s) and parking stand to use
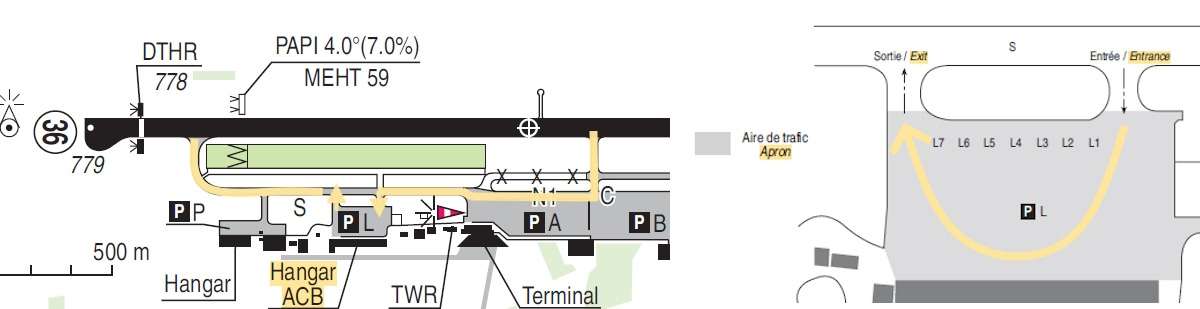
Note in advance which taxiways you plan to follow and which parking area or stand you intend to use after landing.
III.3.5 Windsock Location
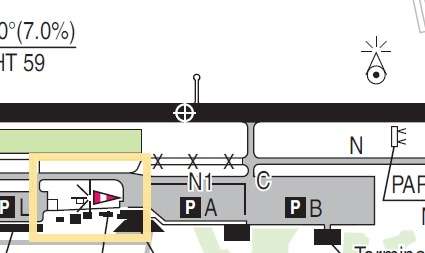
Locate the windsock to visually confirm wind direction and strength when overhead the aerodrome, before joining the traffic pattern.
III.3.6 Fuel Station Location
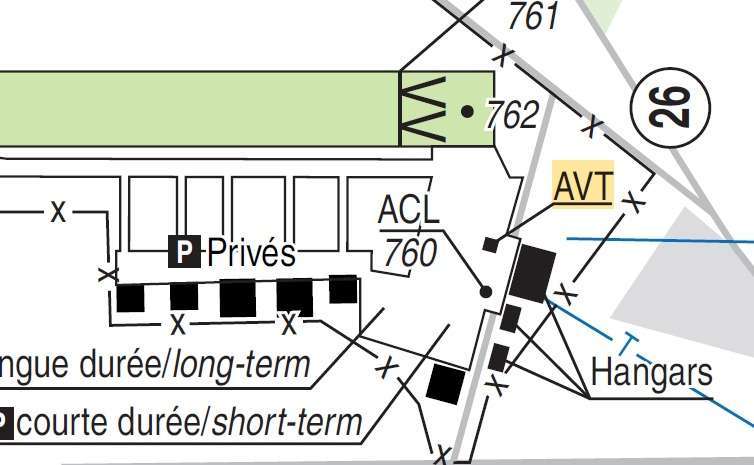
Know where the fuel station is to avoid unnecessary taxiing and delays after landing.
III.3.7 Ground Services & Logistics
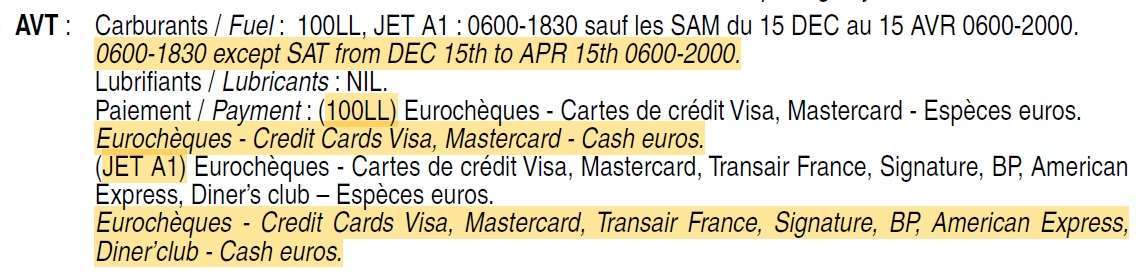


Check fuel availability (type, operating hours, payment methods), customs services if needed, and lighting for night operations.
III.3.8 Departure and arrival procedures
Review the traffic circuit direction, circuit altitude, and any reporting points required for entry and exit.
It is very important to visualize this before arrival to avoid being surprised or disoriented. This preparation allows you to spend more time looking outside according to the VFR “see and avoid” principle, rather than looking at your charts while the aircraft continues flying forward.
III.3.9 Radio Frequencies
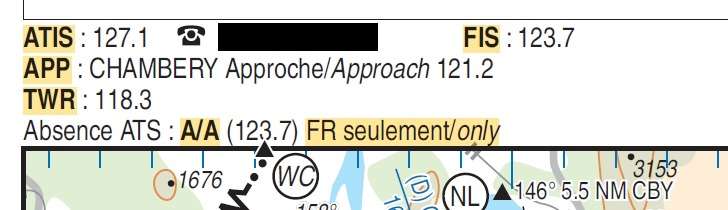
Verify all relevant frequencies and be familiar with the radio failure procedure.
Astuce: Write them on your navigation log to anticipate frequency changes during the flight.
III.3.10 Restricted/prohibited areas, obstacles
Identify nearby restricted or prohibited areas and obstacles that may affect your approach or departure path.
III.4 Route & Airspace Overview
III.4.1 Route
The planned route should be clearly drawn on the chart, with waypoints and navigation features identified. When plotting your route, highlight each turning point with a clear visual marker (for example a circle) and annotate the planned heading and distance for each leg.
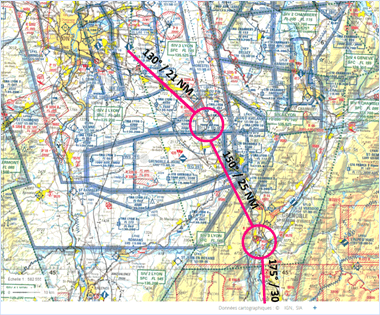
You may use a flight planning application with an integrated VFR chart. However, we strongly recommend having a paper version available in case your iPad or electronic device fails.
III.4.2 TMZ, RMZ, and airspace classes
Check all transponder mandatory zones (TMZ), radio mandatory zones (RMZ), and controlled airspace classes along the route to ensure compliance.
III.4.3 Prohibited, Restricted, Danger areas and other activities
Review P, R, and D areas, as well as any other special activities. Note the type of activity, activation status, and conditions of entry.
See our article: Prohibited, Restricted and Danger Areas
III.4.4 En-route radio frequencies
Record all necessary frequencies in the navigation log, including FIS, ATC sectors, and aerodrome services en route.
III.4.5 Minimum Overflight Altitude
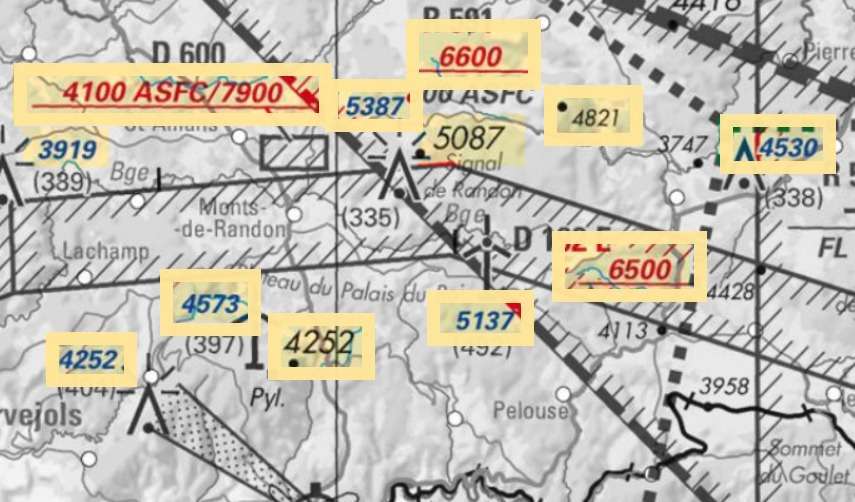
Determine and record the minimum safe altitude for each segment in the navigation log, taking terrain, zones, and obstacles into account.
This will be important when analyzing the weather. For example, if crossing a mountain requires flying at 9,500 ft but the cloud ceiling is below that altitude, you will need to plan an alternate route or postpone the flight in mountainous areas. Likewise, if you plan to fly at 9,500 ft but the aircraft performance is insufficient due to high temperature and the aircraft cannot climb to that altitude, the flight should be postponed.
III.4.6 Daylight sunrise/sunset times
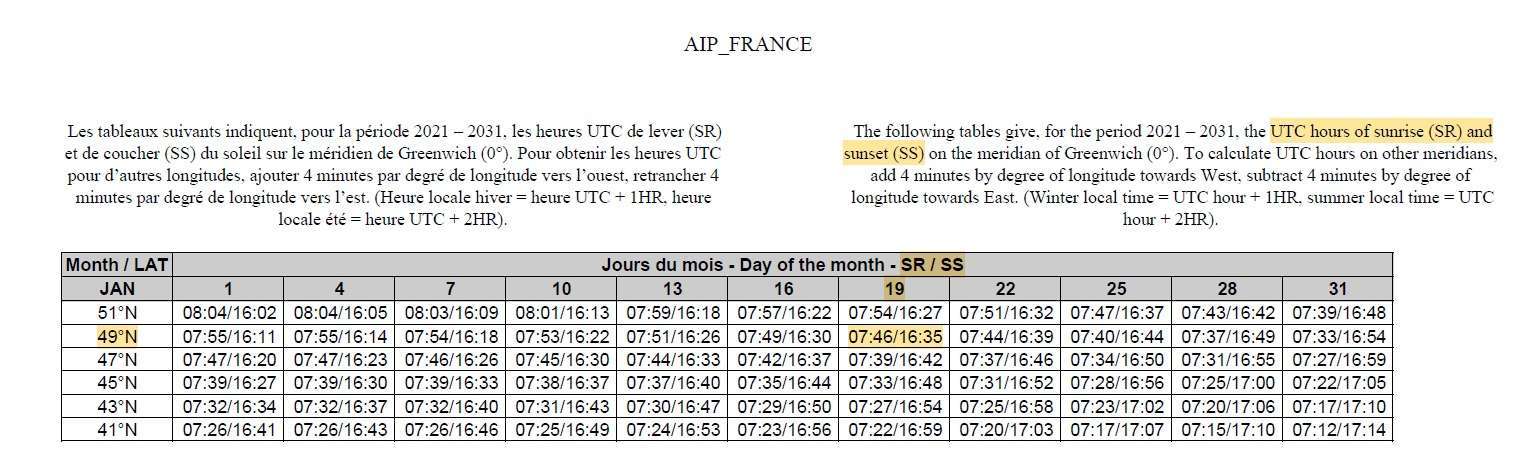
Check the official sunrise and sunset times to ensure compliance with VFR day or night requirements. You can find this information in various AIPs, such as the AIP France, or simply by searching on Google.
III.5 Select Alternate Aerodrome(s)
No alternate aerodrome is explicitly required by regulation for VFR flights under NCO rules.
However, the pilot-in-command remains fully responsible for the safety of the aircraft, its crew, passengers, and cargo during all operations. We strongly recommend planning at least one destination alternate aerodrome.
See our article: Alternate aerodromes (NCO).
III.6 Gather Weather Information

The purpose here is to compare the weather data with the required minima. This helps you make a decision and demonstrate that you remain within the regulations.
Start from the big picture and zoom in step by step: from continental scale (SIGWX, TEMSI Europe) to national level (e.g. TEMSI France, SPECI), then to local information (METAR, TAF, and ATIS before departure). Use local webcams if more precision is needed.
See our article: VFR & SVFR Minima (NCO) for further details.
III.6.1 Required Visibility
-
- At or above FL100: 8 km
- Below FL100: 5 km
Exception (Class F & G in some countries): 1,500 m permitted at or below 3,000 ft AMSL or 1,000 ft AGL, if airspeed ≤ 140 kt.
III.6.2 Distance from Clouds
-
- Horizontally: 1,500 m
- Vertically: 1,000 ft
Exception (Class F & G, at/below 3,000 ft AMSL or 1,000 ft AGL): Clear of cloud and with the surface in sight.
III.6.3 Ceiling
The ceiling should be at least the minimum flying height + 1,000 ft, in order to comply with the vertical distance requirement.
III.6.4 Hazardous Weather Elements
Pay particular attention to the following weather phenomena, which can represent a real hazard for your flight:
-
- Thunderstorms
- Wind Shear
- Turbulence
- Icing
- Fog
These conditions can significantly affect aircraft performance, control, and visibility, and must always be carefully assessed during flight preparation.
III.7 Check Aeronautical Information (NOTAM, AIP)
These messages contain important information that may affect your flight and are essential for your safety. For example, if you fly through an airspace that has been temporarily restricted by a SUP AIP, even if it is not shown on the chart, you may face serious consequences such as heavy fines, licence suspension, or even an accident (for example a collision with military traffic or a drone). Likewise, if a NOTAM indicates that fuel is unavailable at your destination, make sure you have enough fuel to depart again and do not plan a fuel stop there.
It is important to carefully select the time, date, and area concerned by your information search. In France, you can use the SOFIA Briefing website.
See our article NOTAM Structure & Codes.
III.8 Complete Navigation Log
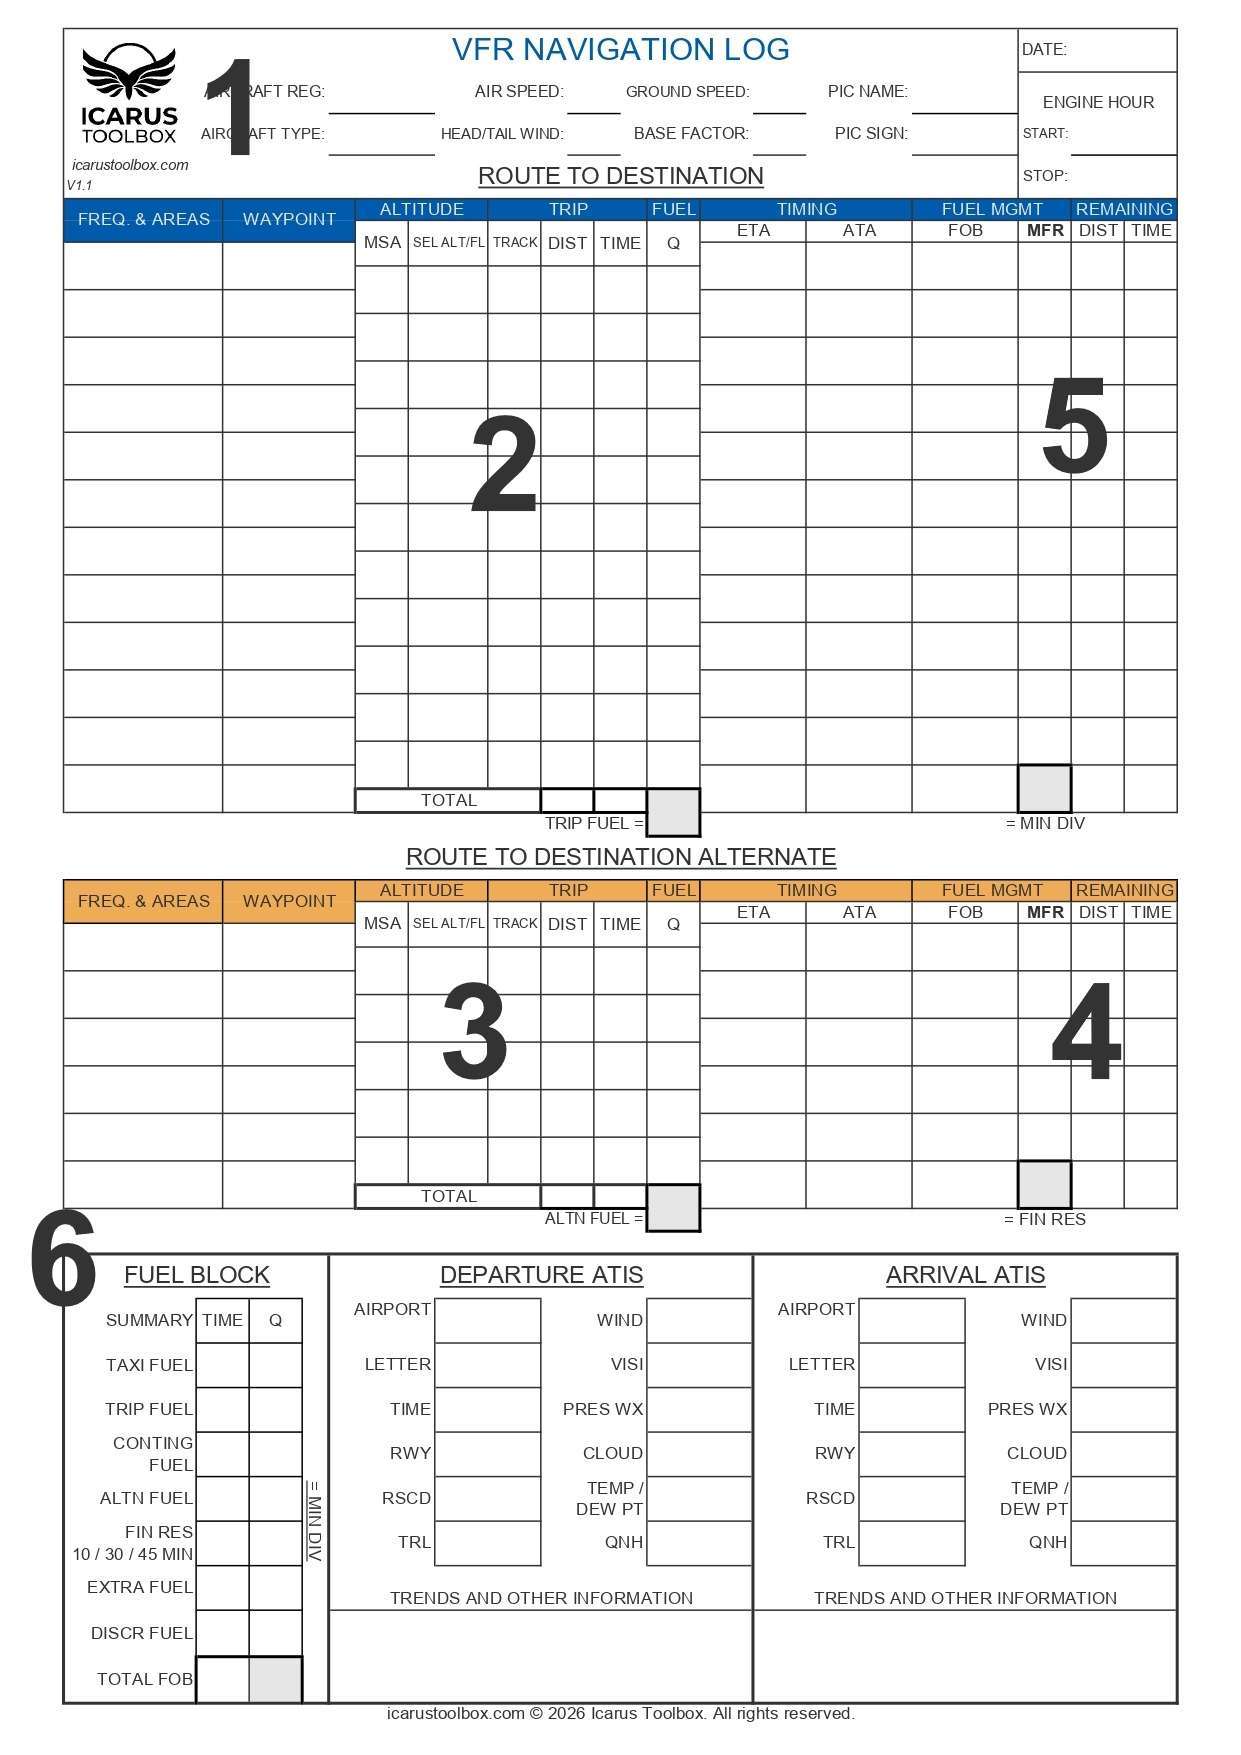
The purpose of the navigation log is to improve your situational awareness during the flight.
Bonus: our navigation log also includes a space to quickly note the departure and arrival ATIS.
III.9 Fuel planning
For more information, see our dedicated article on Minimum Fuel Requirements in NCO.
Very important at this stage: know the minimum fuel required before departing for the flight, and know at all times the minimum fuel required to safely continue the flight. Make sure to perform regular fuel checks during the flight. Be familiar with your aircraft fuel gauges (which gauge corresponds to which tank), and verify the correct position and selection of the fuel selector valve. Too many so-called “fuel starvation” events have occurred even though fuel was still available in a tank, simply because the fuel selector was incorrectly positioned or completely closed.
III.10 Weight and Balance
See our article on how to manage the mass and balance of your small aircraft.
Several elements are important here. For performance calculations, you must know your take-off mass and your landing mass. Make sure you do not exceed the mass and center of gravity envelope specified by the aircraft manufacturer.
III.11 Performance Calculations
III.11.1 Calculated vs Declared Distances
Before departure, you must verify that the aircraft can safely take off and land on the runways you have selected. Performance calculations must always be based on the declared runway distances and the expected operating conditions. See our article on Declared Runway Distances (TORA, TODA, ASDA, and LDA).
Performance calculations should be based on the expected temperature, wind, QNH, runway condition, and aerodrome elevation. For example, if you prepare the flight in the morning when the temperature is 20°C but the forecast indicates 34°C in the afternoon at the time of arrival, you must use the higher temperature in your calculations.
Always base performance calculations on the most limiting declared distance. For instance, if a runway has a displaced threshold and the wind requires you to land in that direction, you must use the reduced landing distance available.
The main declared distances to consider are:
Take-Off Distance Available (TODA): this is the total distance available for take-off, including the runway plus any clearway if applicable.
Accelerate-Stop Distance Available (ASDA): this is the distance available to accelerate for take-off and stop safely if the take-off is rejected.
Landing Distance Available (LDA): this is the declared runway length available for landing.
When calculating landing performance, use the most restrictive LDA among the aerodromes where you may realistically land: the destination, the departure aerodrome if you may return, or any alternate aerodrome.
The landing mass used for calculations depends on the situation. If the alternate aerodrome is close to the departure point or the destination, the aircraft mass will likely be close to the take-off mass. If the diversion aerodrome is farther away, the mass may be closer to the maximum landing mass. When in doubt, using the take-off mass is a simple and conservative approach.
III.11.2 Accelerate-Stop Distance (ASD)
For small general aviation aircrafts operating under NCO rules, the POH sometimes provides the accelerate-stop distance directly in the take-off performance section.
If this value is not provided, a rough estimate can be obtained by adding the take-off ground roll and the landing ground roll:
Accelerate-stop distance ≈ take-off ground roll + landing ground roll.
Knowing your landing distance and landing distance with flaps failure is very useful during the flight. In case of an unexpected diversion or a precautionary landing in the countryside, you should already have a good idea of the minimum distance required to land safely.
III.11.3 Landing Distance with Flap Failure
Flap failure must also be considered, especially on aircraft equipped with electrically operated flaps. A failure of the alternator or battery could make the flaps unavailable.
If the aircraft manufacturer provides landing performance data for flaps-up landings, those values must be used. If no specific data is available, a conservative rule is to increase the normal landing distance by about 50%. For example, if the normal landing distance with landing flaps is 600 m, you should plan for at least 900 m in case of a flap failure.
III.11.4 Allowable Extra Load
Knowing your allowable extra load can be very useful when something changes at the last minute.
Imagine that just before departure, the spouse of one of your passengers asks to join the flight because her meeting was cancelled. You are scheduled to depart in 15 minutes. Can you accept the additional passenger (55 kg) without redoing all your performance calculations?
The most important point is first to know that your aircraft is already within the manufacturer’s mass and center of gravity limits and that your take-off and landing performance are acceptable for the planned runways. However, it can be very useful to know in advance how much additional mass you could theoretically accept while still remaining within those limits. This gives you a clear idea of your margin of manoeuvre and allows you to make quick decisions if something changes at the last minute, without having to redo the entire performance calculation.
For example, some flight manuals provide take-off performance data only for a few weight points. Imagine the manual provides distances for 900 kg and 1200 kg depending on temperature and altitude. If the take-off distance is acceptable at 900 kg but not at 1200 kg, and your planned take-off mass is 840 kg, this means you may theoretically have around 60 kg of additional margin before reaching the next performance limit.
Knowing this margin in advance allows you to quickly determine whether accepting an additional passenger, baggage, or fuel is possible without compromising safety.
If you are already close to the limits, be very cautious. Even if the calculations seem acceptable on paper, real conditions are rarely identical to the assumptions used in planning. Weather conditions may differ from the forecast, pilot technique is never perfectly identical, and older aircraft may not deliver exactly the same performance as in the manual. Passenger weight may also be underestimated, or the aircraft may contain slightly more fuel than expected when you pick it up.
Always remain conservative and avoid operating close to performance limits. If a situation creates doubt or reduces your safety margin, the safest decision is to refuse the additional load.
In our flight preparation worksheet we illustrate this concept mainly for take-off, but the same logic should ideally be applied to landing performance as well.
III.11.5 Zero Fuel Weight (ZFW)
Aircraft performance may also be limited by the Zero Fuel Weight (ZFW). This situation is uncommon for most typical club aircraft, but it should still be considered if your aircraft type has this limitation. To keep this flight preparation worksheet simple, ZFW is not included in the calculations here. However, if your aircraft has a ZFW limitation, make sure to verify it during your weight and balance calculation.
III.11.6 Performance Margins (when AFM data is missing)
When calculating take-off performance, always start with the reference distances given in the AFM/POH for a dry paved runway. Apply any corrections published by the manufacturer for runway conditions, slope, wind, temperature, or surface.
If the AFM does not provide specific corrections, the following conservative margins are commonly recommended:
-
- Dry grass runway: increase take-off distance by +20%
- Wet grass runway: increase take-off distance by +30%
- Runway slope: add +5% take-off distance for each 1% upslope
- Wind: consider at most 50% of the headwind component and at least 150% of the tailwind component
Note: These margins are not strictly required under NCO rules, but applying margins similar to commercial (CAT) operations is good safety practice.
If performance is not sufficient at the estimated take-off or landing weight, corrective actions must be considered, such as:
- Reducing payload (passengers, baggage, non-essential items)
- Reducing fuel load and planning a refuelling stop at a suitable aerodrome
- Selecting a longer runway
- Choosing a different aerodrome
- Departing during a cooler part of the day
- Using a runway with a headwind component
- Applying AFM short-field procedures when applicable
If no safe solution exists, the correct decision is to delay or cancel the flight.
Be familiar with the characteristics of your aerodrome. Some grass runways retain water after heavy rain, significantly increasing rolling resistance. In winter, frost or ice may gradually melt during the morning, making the surface soft and reducing acceleration performance.
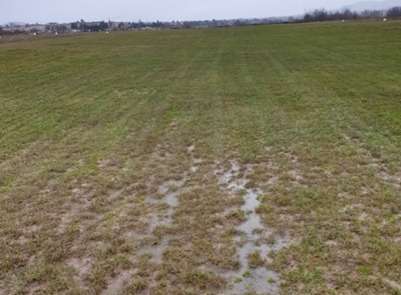
These conditions can drastically increase the distance required to become airborne, and the aircraft may not be able to lift off before the end of the runway.
Also remember that a marginal take-off once does not guarantee it will work a second time. Accident reports exist where pilots attempted another take-off after a long or marginal departure, believing that a warm engine would improve performance. In some cases this ended with a runway excursion and aircraft damage.
III.11.7 Decision Point
In airline operations, pilots rely on defined speeds such as V1 (decision speed) and VR (rotation speed). In light aviation, take-off is usually performed at the speed specified in the aircraft manual.
However, it can be useful to define a decision point during the take-off roll.
A simple rule sometimes used in flying clubs is the following:
If by 50% of the take-off distance available (TODA) you have not reached at least 70% of the planned take-off speed, reject the take-off.
The last knots of acceleration are often the most difficult to achieve, and the earlier the decision to abort is made, the more effective it will be. Conversely, a late decision to abort may not leave enough distance to stop within the available accelerate-stop distance, increasing the risk of a runway excursion. Continuing the take-off with insufficient performance may also place the aircraft in the back side of the power curve (second regime), increasing the risk of a stall during the initial climb.
III.12 Aircraft Technical Status (Tech Log / MEL / etc.)
Check the aircraft technical log (tech log) or any other documents used by your flying club, whether in paper or digital form. Verify that no maintenance inspection is approaching, such as a 50-hour or 100-hour inspection.
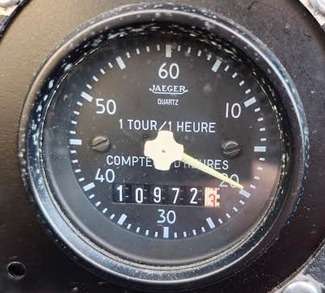
Also check if any defect has been reported. If your aeroclub uses a Minimum Equipment List (MEL), refer to it to determine whether the aircraft can still be operated with the reported defect. See our article Minimum Equipment List (MEL) (NCO) to understand how it works.
Finally, do not forget to perform your preflight inspection before the flight (internal and external checks), including draining the fuel tanks before moving the aircraft.
III.13 Safety Review (Briefings, Risk Factors)
Note any Threats identified
(e.g. high temperatures, intense glider activity, weather deterioration, exam stress, unfamiliar airfield…)
Do not forget to determine Mitigation Measures
(e.g. adjust performance margins, increase lookout, prepare alternates, apply CRM, set personal limits…)
If a threat is identified, you should always define a mitigation measure to reduce the associated risk.
III.14 File Flight Plan & Prepare OFP
You may need to file a flight plan in certain situations (for example IFR flights, flights crossing international borders, night flights leaving the vicinity of an aerodrome, or flights in areas where it is required by the authorities).
In such cases, do not forget to complete and submit the flight plan before departure.
astuce:
III.15 Pilot & Aircraft Documentation
Do not forget to review this checklist before the flight to ensure that nothing important is missing.
III.16 Pilot’s Fitness to Fly
Go through each point carefully. If you feel tired, the risk of making mistakes in flight will increase. Do not hesitate to delay the flight if necessary. Also pay attention to the effects of altitude on your ears. If you feel unwell or have blocked sinuses, pressure changes during climb or descent may become very uncomfortable or even dangerous.
Refer to your human factors training and always assess your fitness to fly honestly.
III.16.1 Pilot Recency Before Carrying Passengers
Regulations require that a pilot must have completed, within the preceding 90 days, at least three take-offs, approaches, and landings as pilot flying in an aircraft of the same type or class (or in an FFS representing that type or class) in order to carry passengers.
For night flights carrying passengers, the pilot must also have completed at least one take-off, approach, and landing at night within the preceding 90 days, unless holding a valid instrument rating.
These requirements ensure that the pilot maintains a minimum level of recency and proficiency before carrying passengers.
Never underestimate the risks of routine: changes can occur, and memory is fallible. That’s why this tool exists — to keep you safe.
III.17 Final Go / No-Go Decision
-
- Have all critical elements been verified (weather, aircraft performance, aerodrome status, NOTAMs, fuel planning, etc.)?
- Do you have any doubts about the flight?
- Has any threat been identified without an effective mitigation measure?
Remember: no meeting, family event, or dinner with friends is worth taking unnecessary risks. If in doubt, remove the risk, postpone the flight or choose another means of transport.
IV. Reference
FCL.060 Recent experience (AIR CREW)